Table of Contents
The Group Leader's Role
Community Aspect.
It is in sharing our faith that we learn our faith. As a group leader, you are responsible to facilitate group members sharing their faith with one another. When a group takes a course together, you provide the leadership and accountability that will enable the group to complete the lessons and discuss the study group questions in each lesson.
Technical Tasks.
As a group leader, you have some technical tasks to complete in Learn.DOLR.org so that your group members will receive a certificate for completing each course. The technical tasks are (1) to form a group and (2) to approve when each group member completes a course.
Form a New Group
A study group is one or more persons who agree to take a course together and discuss their answers to the discussion questions at the end of each lesson. Every group must have a leader. For example, a school principal could form a study group of teachers; a parish Director of Faith Formation could form a study group of parish catechists; and a priest could form a study group of parish staff.
To form a new group in Learn.DOLR.Org, the group leader will click the “Form a Group” button below. It will display an online form for you to fill out and submit. The Faith Formation Office will set up the group in Learn.DOLR.Org and notify you when it is ready. You will then notify your group members to log in to Learn.DOLR.Org and enroll in the group.
Invite Your Group Members to Enroll
Your group members will enroll themselves into your group.
After we notify you that your group is ready, please contact your group members and ask them to log in to Learn.DOLR.org and enroll in the group. Here are step-by-step instructions, if they need it:
- Go to learn.dolr.org and click “Login” in the upper right to log in.
- If this is their first time in, click “Register an Account” and fill out the form to Register.
- Click “Groups” menu item.
- Click “Join a Group”.
- Find the group on the list and click “Request to Join”. It will display a description of the group.
- Click “Enroll in Group”.
Set Up Your Group Leader Dashboard
As a group leader, you have access to the Dashboard where you can add/remove group members and “Approve” when they complete a course.
One-Time Setup of the Group Leader Dashboard.
The first time in, you will need to check some boxes to display the pieces of the dashboard that you will use.
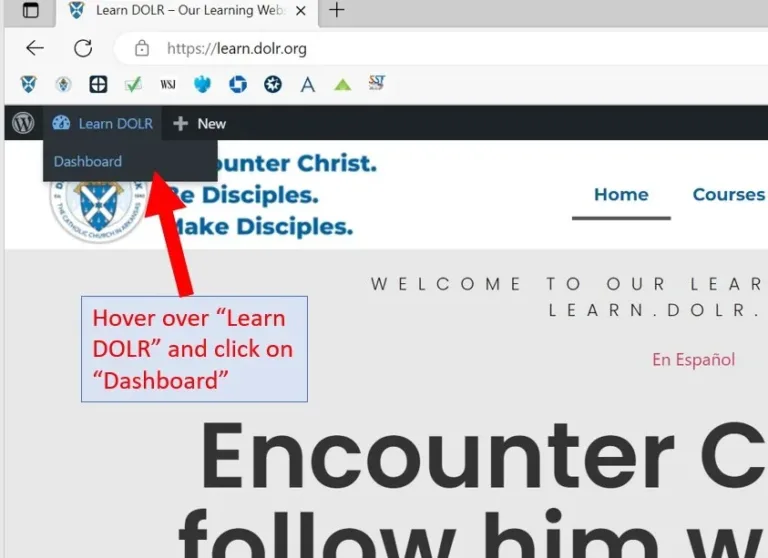
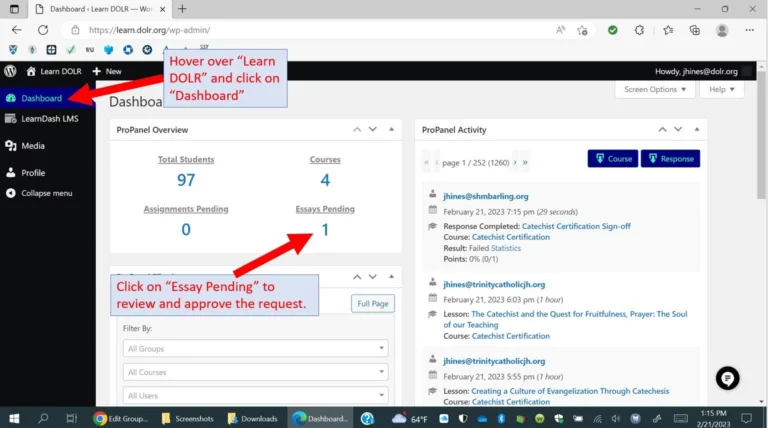
Hover your mouse over “Learn DOLR” way up in the upper left and click on “Dashboard”.
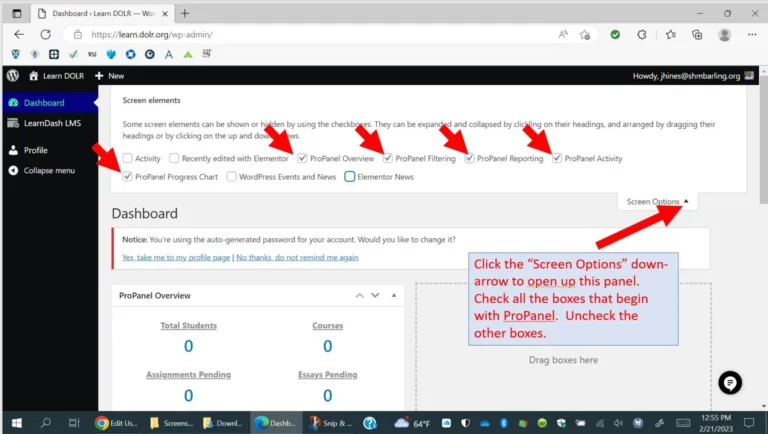
Click the “Screen Options” down-arrow to open the list of check boxes. Check all the boxes that begin with “ProPanel”. Click the “Screen Options” up-arrow to close the options box.
You only have to do this once. It will remember your settings.
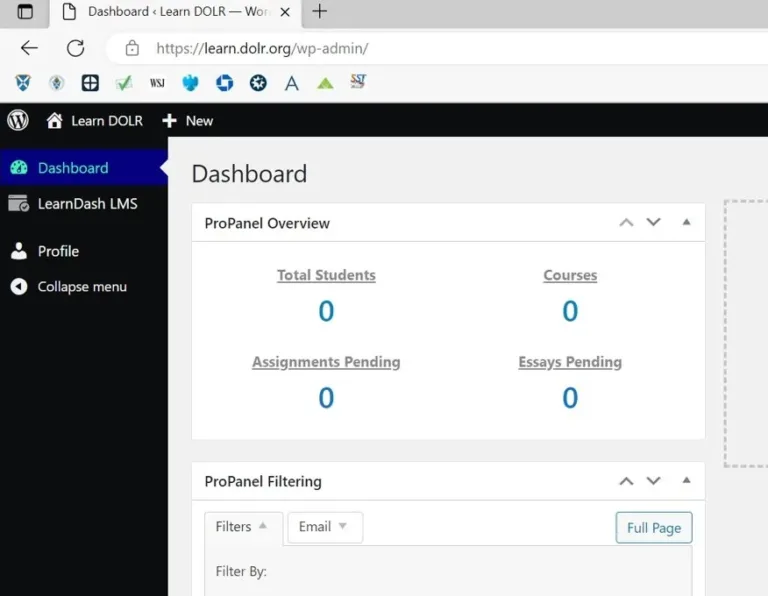
After you have done the set up, your dashboard will look like this:
You are finished with the one-time setup of your Learn DOLR Dashboard.
Display a List of Your Group Members
To display a list of your group members, return to the Dashboard, hover over “LearnDash LMS” and click “Groups”.
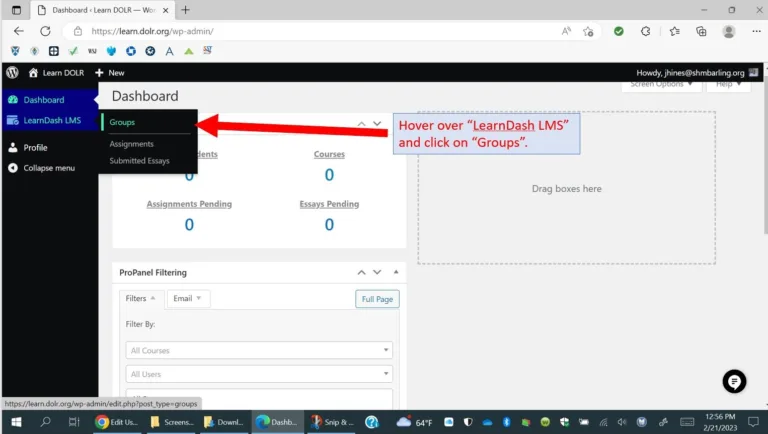
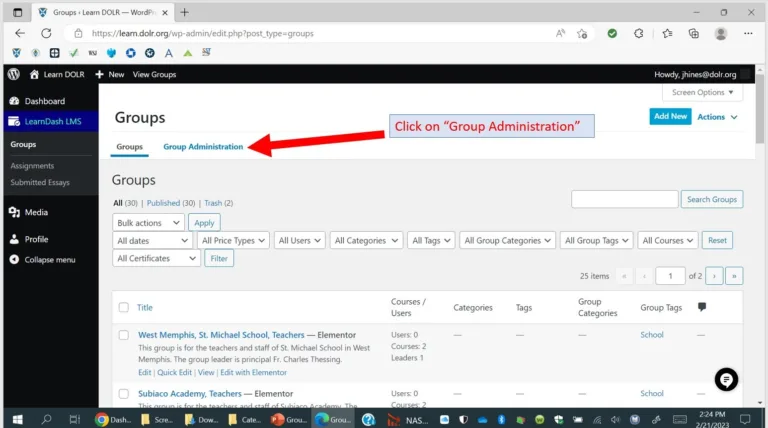
It will display a Groups screen. Click on “Group Administration”.
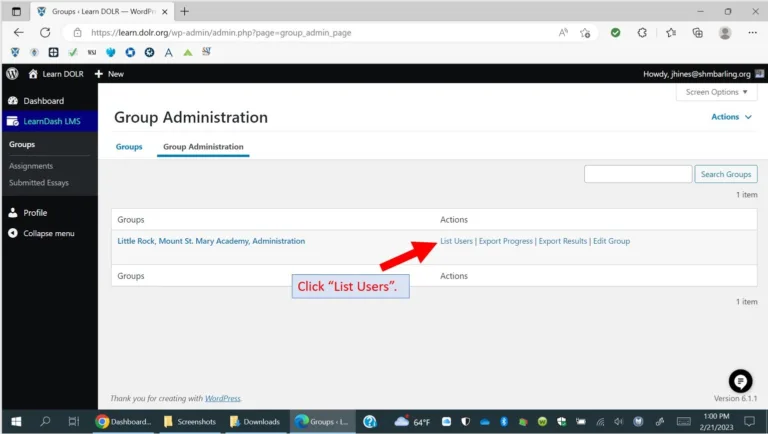
It will display your group where you can click on “List Users”.
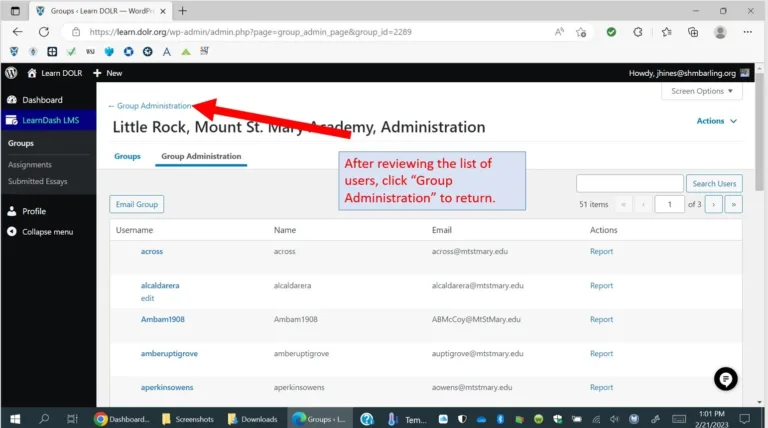
It will display a list of your users and their email addresses. Click “Group Administration” at the top to exit the list.
How To Add or Remove a Group Member
Group members can enroll themselves in the group, so you do not need to add them manually. However, they cannot remove themselves from the group. To remove a group member, go to Group Administration, click “Edit Group” and click “Users”. It will display the screen where you can add/remove users.
Here are the steps:
Go to the Dashboard. Hover your mouse over LearnDash LMS and click “Groups”.

Click “Group Administration”.

Click “Edit Group”.
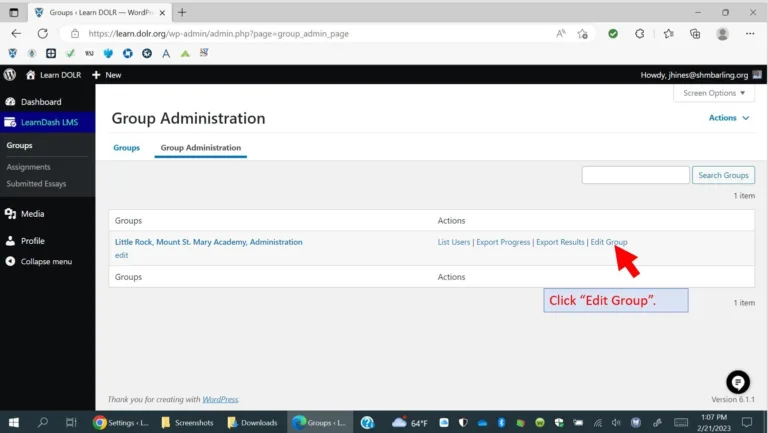
It will display a page showing your group name. Click “Users”.
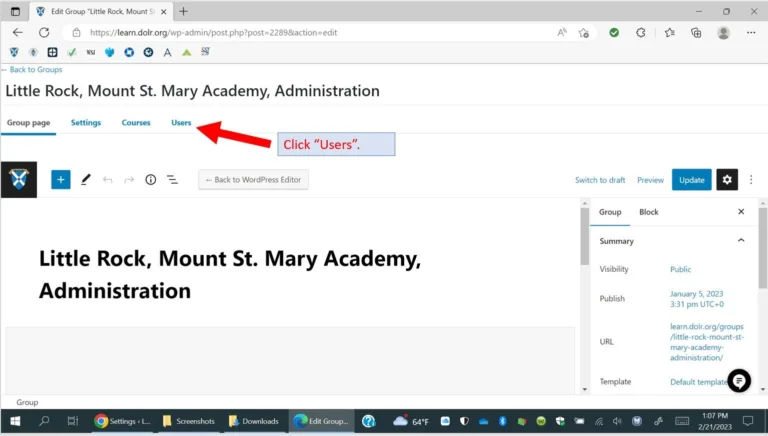
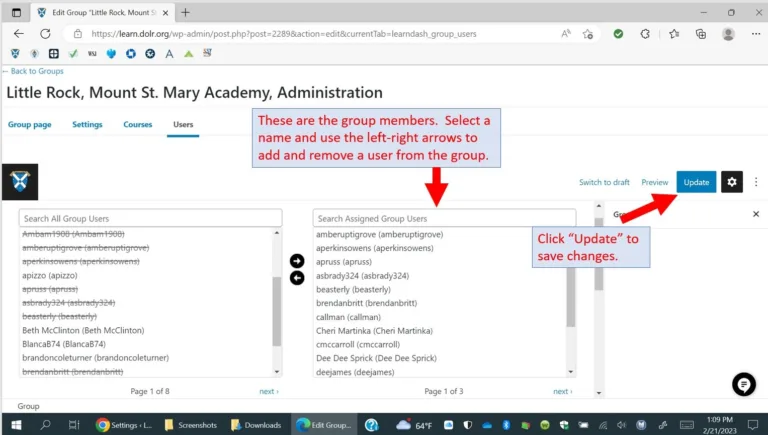
It will display the box where you can add/remove users. The list on the right are your group members.
To remove a member from the group, click on the name in the right-hand box and click the left-pointing error to remove them from the list.
To add a member, click on the name in the left-hand box and click the right-pointing error to add them to the list.
Click “Update” to save your changes.
How to Approve a Group Member's Course Completion
As the group leader, you “Approve” when each group member finishes a course. The Certificate of Completion is automatically issued when you Approve the course.
At the end of the course, the member will submit a digital signature indicating that they have completed the course and request your approval.
You will receive an email to let you know they have submitted a request for your approval.
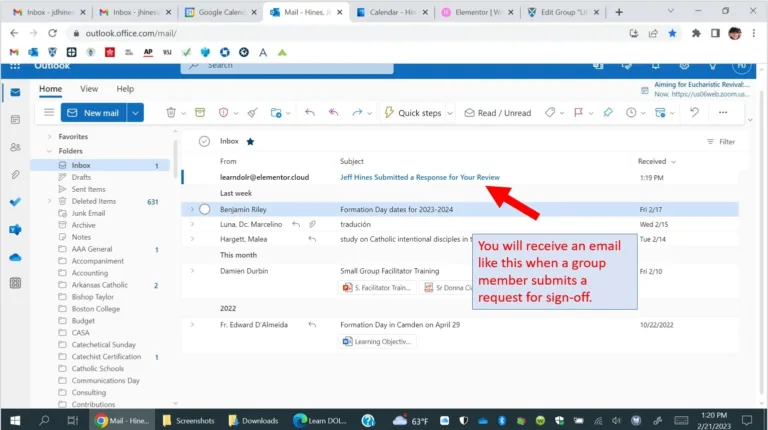
When you receive an email saying you have a response for review, go to the Dashboard.

Click on the number in “Essays Pending”. (The system considers a request for approval an “Essay”, even though all we have asked them to type is their name and date.)
It will display a list of the requests awaiting your approval. Read the name and date shown. If you agree that the person has completed the course with the group, then you may approve it. To approve it, change the Points value from 0 to 1. Click the “Approve” button.
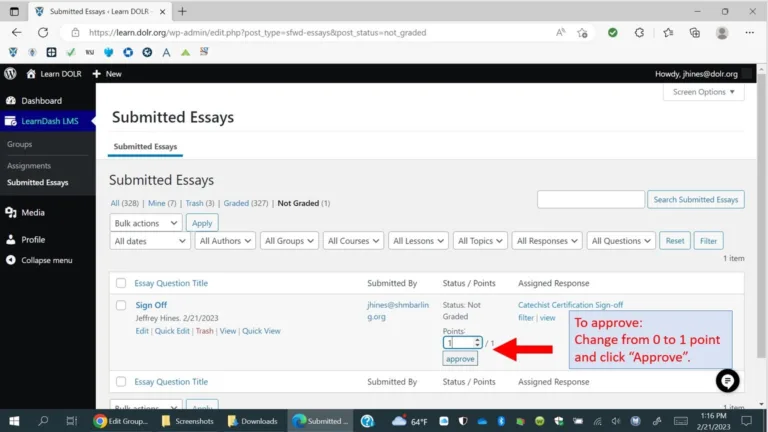
The item will disappear from your screen, indicating that it has been approved.
If you do not agree that the person successfully completed the course with the group, then you should communicate with the person to let them know what they need to do. Click “Trash” to remove the request from your list. They can submit another request for approval when they have completed the lessons.
How to Issue the "Certified Catechist" Certificate.
Catechists request their annual “Certified Catechist” certificate. They are asked to answer three questions:
- Name and Date.
- What course did you complete to qualify for your Certificate? This can be the Catechist Certification course, or a continuing education course for renewing your certificate.
- What desire do you have for the results of your work as a catechist?
Go to the Dashboard and click on the “Essays Pending” number.
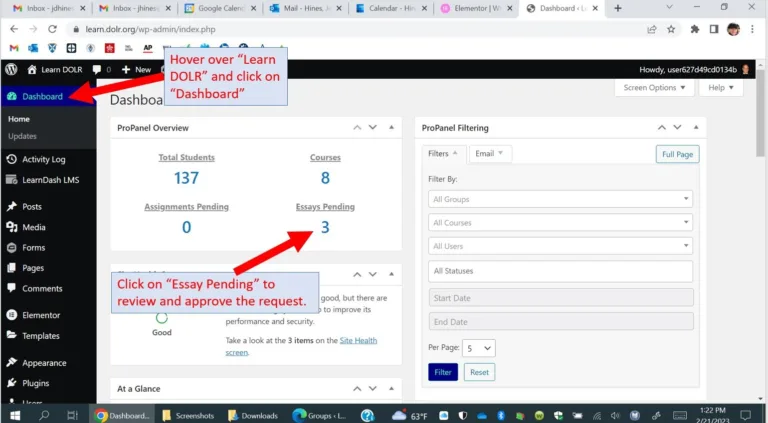
Review their answers. To approve them, change the points value from 0 to 1 and click “Approve”. The items will disappear from your list when they are approved. The Certificate will be automatically issued.
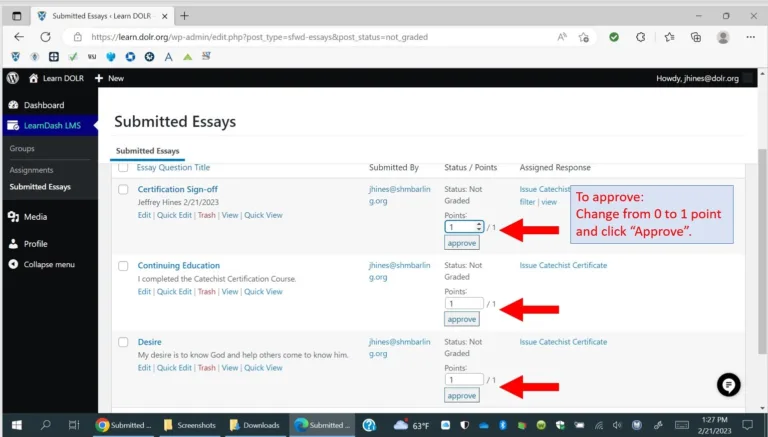
If you do not agree that the member has successfully completed the training to qualify for the Certificate, communicate with the person to let them know. You may click “Trash” to remove it from your list and wait for the person to submit a new approval. If this person is no longer an active member of your group, then you can remove them from your group. See above for instructions on how to remove a person from the group.
How Group Members Can See Their Certificates
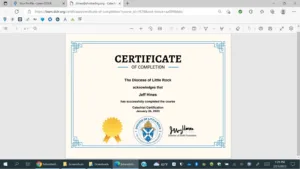
Your group members can click “Your Account” at the top of their screen. It will display a list of the courses they have completed and their certificates.
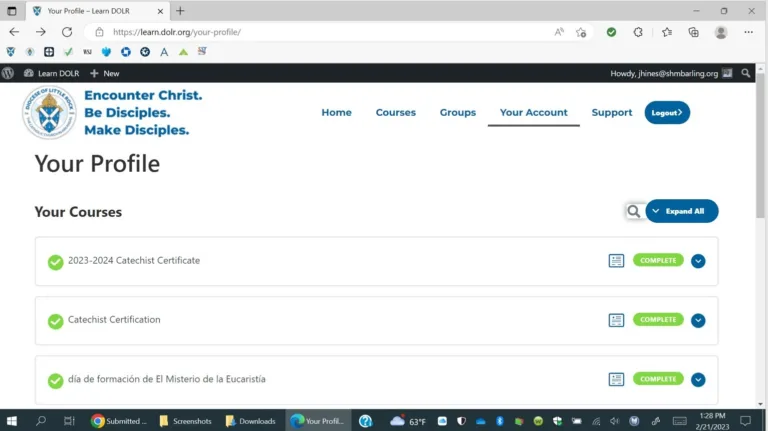
They can click on the certificate icon to display and print their certificate.

To Display a List of Your Certified Catechists
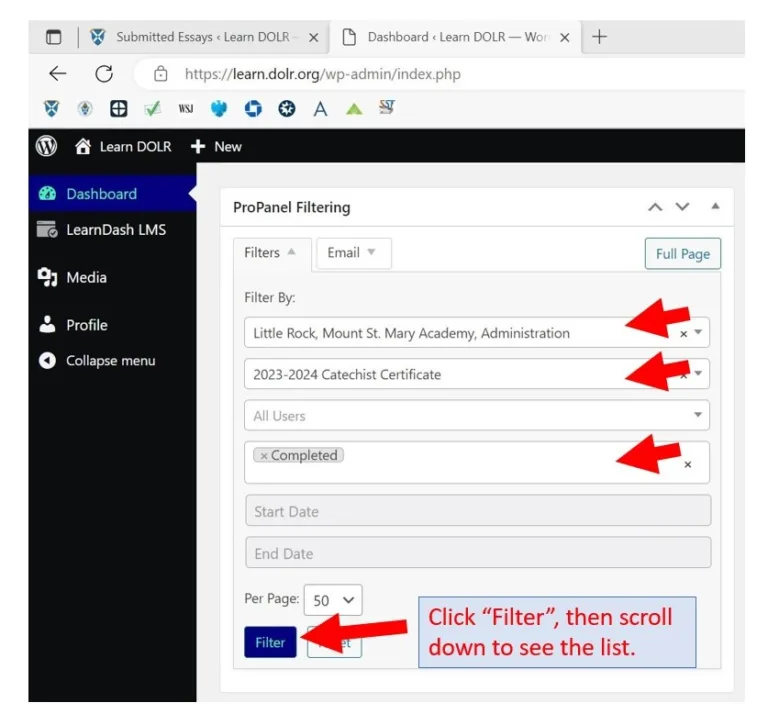
To see a list of your group members who have received their Catechist Certification, go to the Dashboard. Scroll down to the ProPanel filtering box.
In the “Filter by:” box, select your group name, select the course “2023-2024 Catechist Certificate”, and select the status “Completed”.
To Get an Excel List of Your Certified Catechists
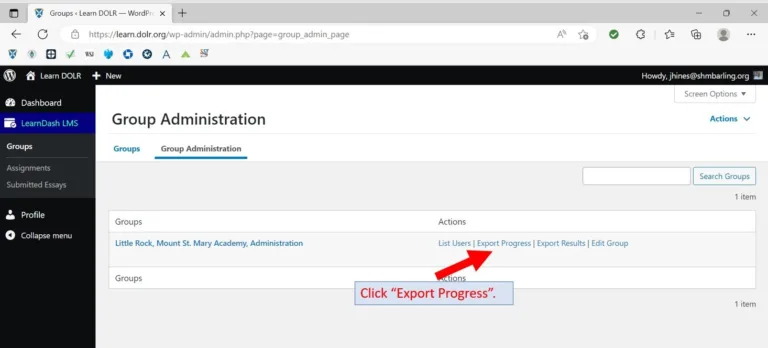
To see a list of the members of your group who have received their Catechist Certification, go to the Dashboard. Hover over “LearnDash LMS” and click “Groups”. Click “Group Administration.” Then choose “Export Progress”.
It will export an Excel spreadsheet of your group members and “Yes” or “No” on whether they have completed their certification.
Request Support
If you need help or have any questions, please contact us and we will help you. Click the button below to request support.

